|
Join us in April as we welcome Tera from *Gaia's Treasures* as our Yarn/Fiber Guest!
All About WoolHow to Measure for Woollies For in stock wool, please note that it is not necessary for the hip or waist measurement to be exact due
to the stretchy nature of knits. You can easily buy within an inch or so of your child's actual
measurements and still get a good fit. Some knitters do not include a waist measurement because the
waistband ribbing is so stretchy and will accommodate a large size range.
What you will need:
All measurements should be taken relatively loosely; you dont want to cinch the tape too tight.
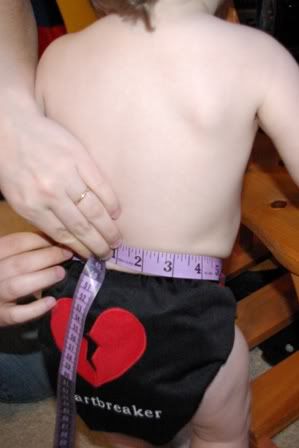
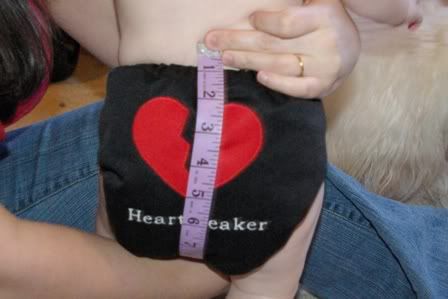
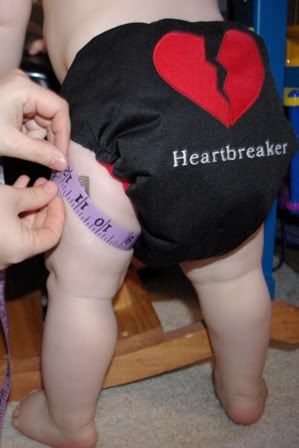
Hip Measurement:
Measure at the widest part of your childs hips over his/her diaper.
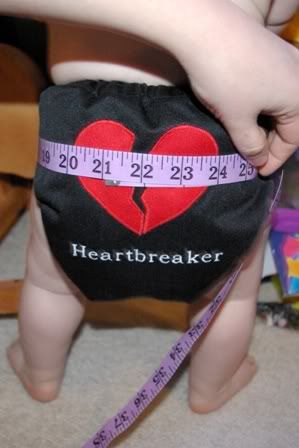
Waist Measurement:
Measure around your childs waist just above the top of his/her diaper.
 Rise Measurement: Start just above the top of your childs diaper, run the tape measurer between your childs legs, up over the top of his/her diaper.
 Inseam Measurement:
Starting at the bottom of the diaper measure your childs leg from thigh to ankle for longies. For shorties, capris or board shorts, measure to where youd like the hem to fall.
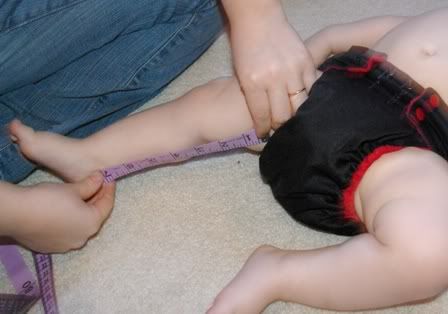 Thigh Measurement:
Measure around the widest point of one thigh.
 You can also measure a pair of regular pants or well fitting, freshly washed (knit tends to stretch
with wear) woollies, but be sure to measure the inseam from the END of the gusset, which is
the wide part right between the legs, since that's the way our knitters measure inseam.
If you are ordering a custom or semi-custom item, please let your knitter know whether youre giving
her your baby's actual measurements and if so, whether or not you want her to add growing room, or
if youve already added growing room to your measurements.
Washing Instructions: Fill your basin with lukewarm water and a few squirts of wool wash (baby wash can be used as a
substitution). Spot clean with a wool wash bar or concentrated liquid wool wash on any stained or
soiled areas. Immerse woollies in wool bath and gently swish once or twice and allow to soak for up to
30 minutes (but can be removed much sooner). Drain the water with the woollies still in the tub so
that if you are using a lanolin rich wool wash it catches in the fibers. Rinse (if specified in directions
on wool wash bottle) and gently squeeze out excess moisture (DO NOT wring, twist or pull on your wet
woolies). Reshape and lay flat to dry.
For Faster Drying:
Lanolizing:
If youre not using lanolin rich wool wash, you can place a small amount of solid or liquid lanolin and
a few squirts of gentle soap/baby shampoo/wool wash in a sealable container. Fill with very hot water
and shake until the lanolin is dissolved and the water has turned milky-looking. Follow
washing/drying instructions above.
To Strip Wool:
If your woollies have been over lanolized, you can remove the excess lanolin by using your gentlest wash cycle on cold, wash your woollies with 1 teaspoon to 2 tablespoons of regular Dawn dish soap
then rewash and lanolize as described above.
The Cost of Wool If you are like many people who are new to wool, you are probably wondering why the price tag seems
so high, so here is a look at what goes into making these lovely creations.
Our pricing begins with the cost of yarn. While some less expensive yarns can be as cheap as a
couple of dollars, they are mass produced and/or imported, which leads to a lower price tag. We
assure you that these wools will yield the same results in terms of being effective over diapers.
However, most of the yarn we use, including the yarn of our featured fiber artists, has a higher price
tag. This is because we are not only paying for the materials, some of which are organic and/or
sheared and spun in the USA, but also for the time and effort that goes into the dying process. There
are many steps involved in the dying process if the dyer wants to get just the right hue and effect in
her colorways.
Once the wool is in our hands, the knitters begin by doing a gauge swatch (unless they have worked
with that type of yarn before) to make sure they will be able to knit a garment in the correct size. Of
course for a custom order, they have communicated with their customers to determine which size and
fit works best on the baby.
Finally, she begins knitting. Even an experienced and "fast" knitter can tell you that knitting is not a
quick process. We need to consider many factors when knitting your garment, such as making sure
the tension of our stitches is all the same, making our short rows and gussets look nice, and making
sure our knitting meets the appropriate measurements. Sometimes a knitter won't like the way a
colorway is working up, so she will knit with two strands of yarn, alternating them every row or two,
and even cutting and rejoining the yarn so that the product is pleasing to the eye. If anything is
terribly off, she will undo her work and do it again.
Once the garment is done, the work is not over. The yarn ends must be woven in, the waisband must
be finished with a drawstring or elastic, and the woollies must be blocked and lanolized. Hooray!
We're ready for pictures! Each garment is photographed, the pictures are uploaded and sometimes
cropped and resized, and for our instock products a listing is made so you can make your purchase,
which of course must be packaged and mailed out once someone has decided to welcome it into her
home.
We hope that this helps you understand that while our prices are high, they are more than fair to
appropriately compensate a knitter for her time. Back to Their Own Knitted World in-stock store | View past items
|


|
|